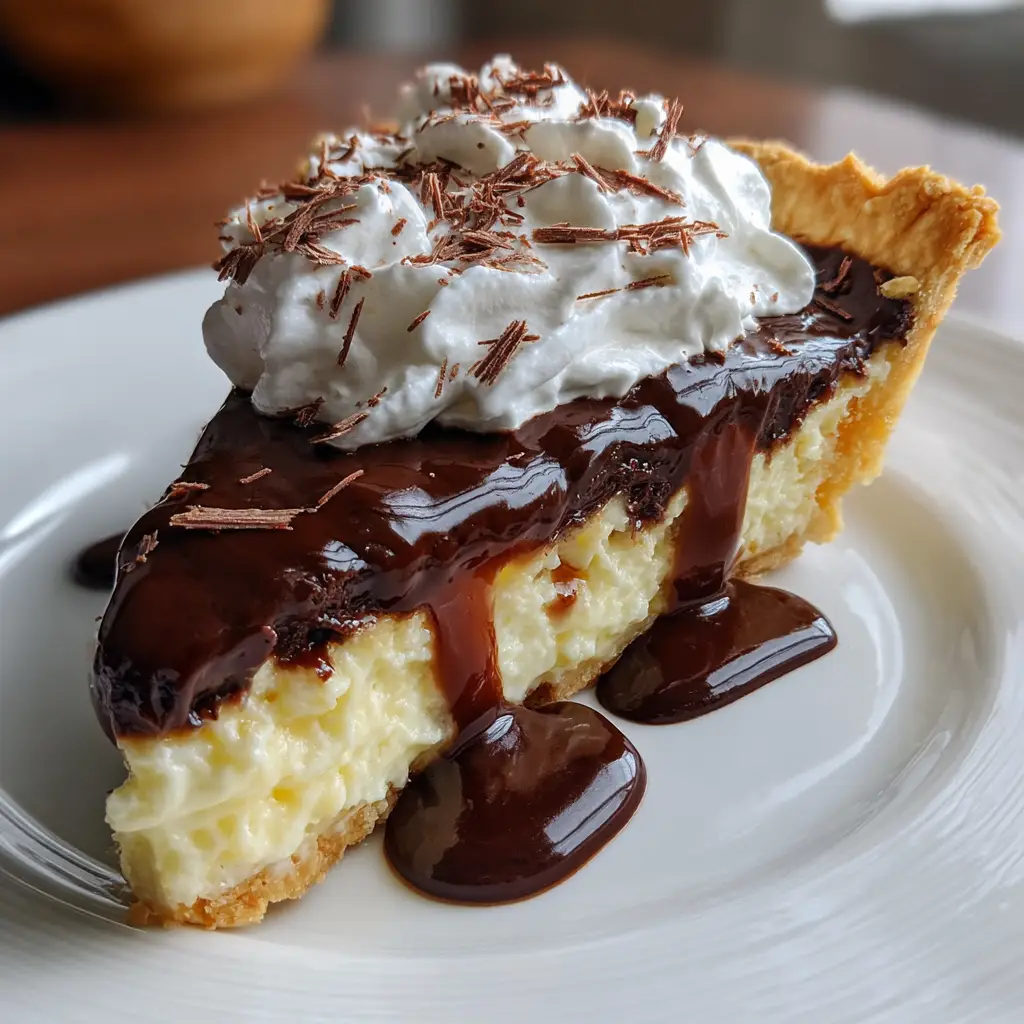
Introduction to Old Fashioned Chocolate Pie
There’s something magical about an Old Fashioned Chocolate Pie that takes me back to my childhood. The rich, creamy filling and the flaky crust remind me of family gatherings and laughter around the dinner table. If you’re a busy mom or professional, this classic dessert is a quick solution for a sweet craving or a delightful way to impress your loved ones. With just a few simple ingredients, you can whip up a slice of nostalgia that will have everyone asking for seconds. Trust me, this pie is a hug in dessert form!
Why You’ll Love This Old Fashioned Chocolate Pie
This Old Fashioned Chocolate Pie is not just a dessert; it’s a comforting embrace after a long day. It’s incredibly easy to make, taking only about 20 minutes of your time. The rich chocolate flavor dances on your taste buds, while the creamy texture melts in your mouth. Plus, it’s a crowd-pleaser! Whether it’s a family dinner or a potluck, this pie will surely steal the show.
Ingredients for Old Fashioned Chocolate Pie
Gathering the right ingredients is the first step to creating your Old Fashioned Chocolate Pie. Here’s what you’ll need:
- Pre-baked pie crust: A flaky crust is essential. You can use store-bought for convenience or make your own if you’re feeling adventurous.
- Granulated sugar: This sweetener balances the rich chocolate flavor, making every bite delightful.
- Unsweetened cocoa powder: The star of the show! It gives the pie its deep chocolate flavor. For a richer taste, consider using dark chocolate cocoa powder.
- Cornstarch: This thickening agent helps create that luscious, creamy texture we all love in a chocolate pie.
- Salt: Just a pinch enhances the sweetness and rounds out the flavors beautifully.
- Milk: Whole milk is best for a creamy filling, but you can substitute with almond or oat milk for a dairy-free option.
- Egg yolks: These add richness and help set the filling. Make sure to beat them well before adding to the mixture.
- Butter: A couple of tablespoons of butter add a silky finish to the filling.
- Vanilla extract: This aromatic ingredient elevates the flavor profile, making it even more irresistible.
- Whipped cream (optional): A dollop on top adds a light, fluffy contrast to the rich pie.
For exact measurements, check the bottom of the article where you can find everything listed for easy printing. Happy baking!

How to Make Old Fashioned Chocolate Pie
Now that you have all your ingredients ready, let’s dive into the delightful process of making this Old Fashioned Chocolate Pie. Follow these simple steps, and you’ll have a delicious dessert that will impress everyone!
Step 1: Prepare the Mixture
Start by grabbing a medium saucepan. In it, mix together the granulated sugar, unsweetened cocoa powder, cornstarch, and salt. This dry mixture is the foundation of your pie’s rich flavor. Make sure to combine them well, so there are no lumps. Trust me, a smooth filling is key!
Step 2: Whisk in the Milk
Next, gradually whisk in the milk. I like to do this slowly to ensure everything blends smoothly. Keep whisking until the mixture is completely combined and free of lumps. This step is crucial for achieving that creamy texture we all love in an Old Fashioned Chocolate Pie.
Step 3: Cook Until Thickened
Now, place the saucepan over medium heat. Stir constantly as the mixture heats up. You’ll notice it starting to thicken and bubble. This usually takes about 5 to 7 minutes. Keep stirring to prevent any sticking or burning. The aroma of chocolate will fill your kitchen, and it’s simply heavenly!
Step 4: Temper the Egg Yolks
Once your mixture is thickened, it’s time to temper the egg yolks. Take a small amount of the hot chocolate mixture and whisk it into the beaten egg yolks. This step is important to avoid scrambling the eggs. It’s like giving them a warm hug before they join the party!
Step 5: Combine and Cook Again
Now, return the tempered egg yolk mixture back to the saucepan. Cook for an additional 2 minutes, stirring constantly. This will help the filling set perfectly. You’ll see it become even creamier and more luscious. It’s hard not to sneak a taste at this point!
Step 6: Pour into the Crust
Once your filling is ready, remove it from the heat. Stir in the butter and vanilla extract until they’re fully incorporated. Then, pour this rich chocolate filling into your pre-baked pie crust. Spread it evenly, and don’t be shy about licking the spoon—it’s that good!
Step 7: Cool and Refrigerate
Let the pie cool at room temperature for about 30 minutes. After that, pop it in the refrigerator for at least 4 hours. This chilling time allows the filling to set beautifully. If you can wait until the next day, it tastes even better after a night in the fridge!
Step 8: Serve with Whipped Cream
When you’re ready to serve, top each slice with a dollop of whipped cream if desired. The light, fluffy cream contrasts perfectly with the rich chocolate filling. It’s the finishing touch that makes this Old Fashioned Chocolate Pie truly irresistible!
Tips for Success
- Always whisk constantly while cooking to prevent lumps in your filling.
- For a richer flavor, opt for dark chocolate cocoa powder instead of regular.
- Make the pie a day ahead; it tastes even better after chilling overnight.
- Use a pie crust shield or foil to prevent over-browning if baking your own crust.
- Don’t skip the whipped cream; it adds a delightful contrast to the pie!
Equipment Needed
- Medium saucepan: Essential for cooking the filling. A large skillet can work in a pinch.
- Whisk: Perfect for mixing ingredients. A fork can also do the job if you’re in a hurry.
- Measuring cups and spoons: For accuracy. You can use a kitchen scale if you prefer.
- Pie dish: A standard 9-inch pie dish is ideal. Any oven-safe dish can substitute.
- Mixing bowl: For beating the egg yolks. A large mug can work too!
Variations of Old Fashioned Chocolate Pie
- Peanut Butter Chocolate Pie: Swirl in some creamy peanut butter into the filling for a delightful twist that adds a nutty flavor.
- Mint Chocolate Pie: Add a few drops of peppermint extract to the filling for a refreshing minty kick that pairs beautifully with chocolate.
- Dairy-Free Option: Substitute whole milk with almond or coconut milk and use dairy-free butter for a delicious vegan-friendly version.
- Chocolate Hazelnut Pie: Mix in some hazelnut spread for a rich, nutty flavor that will transport you to dessert heaven.
- Gluten-Free Option: Use a gluten-free pie crust to make this classic dessert suitable for those with gluten sensitivities.
Serving Suggestions for Old Fashioned Chocolate Pie
- Pair with fresh berries like strawberries or raspberries for a pop of color and tartness.
- Serve alongside a scoop of vanilla ice cream for an indulgent treat.
- Drizzle with chocolate sauce for an extra touch of decadence.
- Enjoy with a cup of coffee or a glass of cold milk to balance the sweetness.
- Garnish with chocolate shavings or a sprinkle of cocoa powder for a beautiful presentation.
FAQs about Old Fashioned Chocolate Pie
Can I make Old Fashioned Chocolate Pie ahead of time?
Absolutely! In fact, making it a day in advance enhances the flavors. Just store it in the refrigerator after it cools.
What can I use instead of a pre-baked pie crust?
If you’re short on time, a store-bought crust is perfect. Alternatively, you can make a graham cracker crust for a fun twist!
How do I store leftovers?
Keep any leftover pie covered in the refrigerator. It should stay fresh for up to 3 days, but I doubt it will last that long!
Can I use a different type of milk?
Yes! Almond, oat, or coconut milk can be used as substitutes. Just ensure they’re unsweetened for the best results.
What’s the best way to serve Old Fashioned Chocolate Pie?
Top each slice with whipped cream and fresh berries. A drizzle of chocolate sauce adds an extra touch of indulgence!
Final Thoughts
Making an Old Fashioned Chocolate Pie is more than just baking; it’s about creating memories. Each slice is a reminder of family gatherings, laughter, and the simple joys of life. The rich chocolate filling and flaky crust come together to create a dessert that warms the heart. Whether you’re sharing it with loved ones or enjoying a quiet moment to yourself, this pie brings a sense of comfort and nostalgia. So, roll up your sleeves, gather your ingredients, and let the magic of this classic dessert fill your home with sweetness and love. Happy baking!
Print
Old Fashioned Chocolate Pie: A Slice of Nostalgia Awaits!
- Total Time: 4 hours 35 minutes
- Yield: 8 servings 1x
- Diet: Vegetarian
Description
A classic dessert that brings back memories with its rich chocolate flavor and creamy texture.
Ingredients
- 1 pre-baked pie crust
- 1 cup granulated sugar
- 1/3 cup unsweetened cocoa powder
- 1/4 cup cornstarch
- 1/4 teaspoon salt
- 2 3/4 cups milk
- 3 large egg yolks, beaten
- 2 tablespoons butter
- 1 teaspoon vanilla extract
- Whipped cream for topping (optional)
Instructions
- In a saucepan, mix sugar, cocoa powder, cornstarch, and salt.
- Gradually whisk in the milk until smooth.
- Cook over medium heat, stirring constantly until the mixture thickens and bubbles.
- Remove from heat and stir a small amount of the hot mixture into the beaten egg yolks to temper them.
- Return the egg yolk mixture to the saucepan and cook for an additional 2 minutes.
- Stir in the butter and vanilla extract until well combined.
- Pour the chocolate filling into the pre-baked pie crust.
- Let it cool at room temperature, then refrigerate for at least 4 hours before serving.
- Top with whipped cream if desired before serving.
Notes
- For a richer flavor, use dark chocolate cocoa powder.
- Make sure to whisk constantly to prevent lumps.
- This pie can be made a day in advance for convenience.
- Prep Time: 20 minutes
- Cook Time: 15 minutes
- Category: Dessert
- Method: Baking
- Cuisine: American
Nutrition
- Serving Size: 1 slice
- Calories: 320
- Sugar: 25g
- Sodium: 150mg
- Fat: 15g
- Saturated Fat: 8g
- Unsaturated Fat: 5g
- Trans Fat: 0g
- Carbohydrates: 40g
- Fiber: 2g
- Protein: 5g
- Cholesterol: 80mg