Introduction to Loaded Taco Shells with Creamy Cheese Sauce
Hey there, fellow food lovers! If you’re anything like me, you know that life can get pretty hectic. Between juggling work, family, and everything in between, finding time to whip up a delicious meal can feel like a daunting task. That’s where these Loaded Taco Shells with Creamy Cheese Sauce come in! They’re not just a quick solution for a busy day; they’re a delightful dish that will impress your loved ones. Imagine crispy taco shells filled with savory goodness, all drizzled with a rich, creamy cheese sauce. Sounds tempting, right?
Why You’ll Love This Loaded Taco Shells with Creamy Cheese Sauce
These Loaded Taco Shells with Creamy Cheese Sauce are a game-changer for busy nights. They come together in just 35 minutes, making them perfect for those evenings when time is tight. The combination of flavors is simply irresistible, and the creamy cheese sauce takes them to a whole new level. Plus, they’re customizable, so everyone in the family can enjoy their favorite toppings. What’s not to love?
Ingredients for Loaded Taco Shells with Creamy Cheese Sauce
Let’s gather our ingredients for these mouthwatering Loaded Taco Shells with Creamy Cheese Sauce! Each component plays a vital role in creating that perfect bite. Here’s what you’ll need:
- Taco shells: The crispy base that holds all the delicious fillings. You can use hard or soft shells, depending on your preference.
- Ground beef: This savory protein is the star of the show. You can substitute it with ground turkey or chicken for a leaner option.
- Taco seasoning: A blend of spices that adds a burst of flavor. You can use store-bought or make your own with chili powder, cumin, and paprika.
- Shredded lettuce: This adds a refreshing crunch and a pop of color to your tacos.
- Diced tomatoes: Juicy and vibrant, they bring a fresh taste that balances the richness of the cheese sauce.
- Shredded cheese: A must-have for that gooey, melty goodness. Cheddar or a Mexican blend works beautifully.
- Sour cream: This creamy topping adds a tangy finish that complements the flavors perfectly.
- Cream cheese: The secret ingredient for our creamy cheese sauce. It gives a rich texture that’s hard to resist.
- Milk: Helps to achieve the right consistency for the cheese sauce. You can use any milk you have on hand.
- Garlic powder: A sprinkle of this adds depth and warmth to the cheese sauce.
- Onion powder: Another flavor booster that enhances the overall taste of the dish.
- Salt and pepper: Essential for seasoning to taste. Don’t forget to adjust according to your preference!
Feel free to get creative! You can add jalapeños for a spicy kick or avocado for a creamy texture. If you’re looking for a vegetarian option, black beans or lentils make a fantastic substitute for ground beef. For exact quantities, check the bottom of the article where you can find everything available for printing!
How to Make Loaded Taco Shells with Creamy Cheese Sauce
Now that we have our ingredients ready, let’s dive into the fun part—making these Loaded Taco Shells with Creamy Cheese Sauce! Follow these simple steps, and you’ll have a delicious meal on the table in no time.
Step 1: Preheat the Oven
First things first, preheat your oven to 350°F (175°C). Preheating is crucial because it ensures that your taco shells bake evenly. A hot oven helps them become crispy and golden, which is exactly what we want!
Step 2: Cook the Ground Beef
Next, grab a skillet and cook the ground beef over medium heat. Use a wooden spoon to break it apart as it cooks. You want it to brown nicely, which adds flavor. Once it’s browned, sprinkle in the taco seasoning. Follow the package instructions for adding water, and let it simmer for about 5 minutes. This step is key for infusing the beef with that classic taco flavor!
Step 3: Prepare the Cheese Sauce
Now, let’s make that creamy cheese sauce! In a saucepan, combine the cream cheese, milk, garlic powder, and onion powder. Heat it over low to medium heat, stirring constantly until it’s smooth and creamy. If it’s too thick, add a splash more milk. This sauce is the magic that ties everything together, so don’t rush it!
Step 4: Assemble the Taco Shells
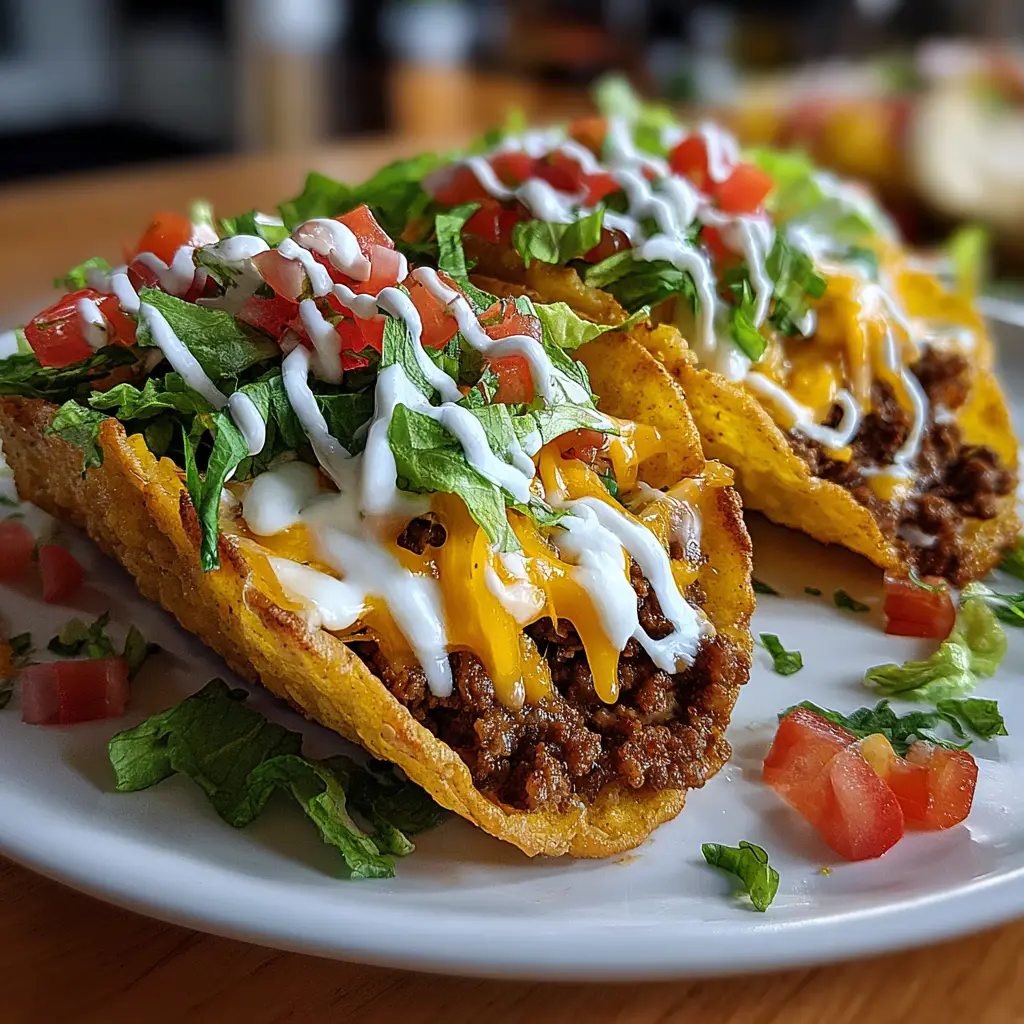
Time to fill those taco shells! Start by spooning the seasoned ground beef into each shell. Then, layer on the shredded lettuce, diced tomatoes, and shredded cheese. Don’t be shy—load them up! Finally, drizzle that luscious cheese sauce over the top. It’s like a warm hug for your tacos!
Step 5: Bake the Taco Shells
Place the filled taco shells in the preheated oven and bake for about 10 minutes. Keep an eye on them! You want the cheese to melt and the shells to get crispy but not burnt. The aroma wafting through your kitchen will be irresistible!
Step 6: Serve and Enjoy
Once they’re out of the oven, it’s time to serve! Place the taco shells on a platter and add a dollop of sour cream on top. You can also sprinkle some extra toppings like chopped cilantro or sliced jalapeños for a pop of color. Gather your family around the table and enjoy this delightful meal together!
Tips for Success
- Always preheat your oven for even baking.
- Don’t rush the cheese sauce; stir until smooth for the best texture.
- Feel free to customize toppings based on your family’s preferences.
- Keep an eye on the taco shells while baking to avoid burning.
- Use leftover taco filling for a quick lunch the next day!

Equipment Needed
- Skillet: A non-stick skillet works best for browning the beef.
- Saucepan: Use any medium-sized saucepan for the cheese sauce.
- Oven: A conventional oven is ideal, but a toaster oven can work too.
- Wooden spoon: Great for stirring and breaking up the beef.
- Platter: For serving your delicious Loaded Taco Shells!
Variations
- Vegetarian Delight: Swap the ground beef for black beans, lentils, or sautéed mushrooms for a hearty vegetarian option.
- Spicy Kick: Add diced jalapeños or a splash of hot sauce to the beef mixture for an extra layer of heat.
- Cheesy Overload: Mix in different types of cheese like pepper jack or Monterey Jack for a unique flavor twist.
- Low-Carb Option: Use lettuce wraps instead of taco shells for a lighter, low-carb meal.
- Southwestern Style: Incorporate corn and black olives into the filling for a southwestern flair.
Serving Suggestions
- Side Salad: Pair your Loaded Taco Shells with a fresh garden salad for a refreshing crunch.
- Rice: Serve with cilantro-lime rice for a zesty complement to the flavors.
- Drinks: Enjoy with a chilled margarita or a refreshing iced tea.
- Presentation: Garnish with fresh cilantro and lime wedges for a vibrant touch.
FAQs about Loaded Taco Shells with Creamy Cheese Sauce
Can I make Loaded Taco Shells with Creamy Cheese Sauce ahead of time?
Absolutely! You can prepare the filling and cheese sauce in advance. Just store them separately in the fridge. When you’re ready to eat, assemble the taco shells and bake them for a quick meal.
What can I use instead of ground beef?
If you’re looking for alternatives, ground turkey or chicken works well. For a vegetarian option, try black beans, lentils, or even crumbled tofu. The flavors will still shine through!
How do I store leftovers?
Store any leftovers in an airtight container in the fridge for up to three days. Reheat in the oven for a few minutes to keep the shells crispy.
Can I freeze Loaded Taco Shells with Creamy Cheese Sauce?
Yes, you can freeze the assembled taco shells before baking. Just wrap them tightly in plastic wrap and foil. When you’re ready to enjoy, bake them straight from the freezer, adding a few extra minutes to the cooking time.
What toppings do you recommend for Loaded Taco Shells?
Get creative! I love adding sliced jalapeños, diced avocados, or fresh cilantro. You can also sprinkle some crushed tortilla chips on top for an extra crunch!
Final Thoughts
Cooking should be a joyful experience, and these Loaded Taco Shells with Creamy Cheese Sauce truly embody that spirit. They’re not just a meal; they’re a celebration of flavors that brings family together. The crispy shells, savory beef, and creamy sauce create a delightful harmony that’s hard to resist. Plus, the ease of preparation means you can spend more time enjoying the company of your loved ones. So, whether it’s a busy weeknight or a fun gathering, these tacos are sure to bring smiles and satisfaction to your table. Happy cooking!
Print
Loaded Taco Shells with Creamy Cheese Sauce: A Flavor Delight!
- Total Time: 35 minutes
- Yield: 4 servings 1x
- Diet: Gluten Free
Description
Loaded Taco Shells filled with savory ingredients and topped with a creamy cheese sauce for a delicious meal.
Ingredients
- 12 taco shells
- 1 lb ground beef
- 1 packet taco seasoning
- 1 cup shredded lettuce
- 1 cup diced tomatoes
- 1 cup shredded cheese
- 1 cup sour cream
- 1/2 cup cream cheese
- 1/2 cup milk
- 1 tsp garlic powder
- 1 tsp onion powder
- Salt and pepper to taste
Instructions
- Preheat the oven to 350°F (175°C).
- In a skillet, cook the ground beef over medium heat until browned.
- Add taco seasoning and water as per package instructions, and simmer for 5 minutes.
- In a saucepan, combine cream cheese, milk, garlic powder, onion powder, and heat until smooth to create the cheese sauce.
- Fill each taco shell with the seasoned beef, lettuce, tomatoes, and shredded cheese.
- Drizzle the creamy cheese sauce over the filled taco shells.
- Place the taco shells in the oven and bake for 10 minutes.
- Serve hot with a dollop of sour cream on top.
Notes
- Feel free to add other toppings like jalapeños or avocado.
- For a vegetarian option, substitute ground beef with black beans or lentils.
- Make sure to keep an eye on the taco shells while baking to prevent burning.
- Prep Time: 15 minutes
- Cook Time: 20 minutes
- Category: Main Course
- Method: Baking
- Cuisine: Mexican
Nutrition
- Serving Size: 1 taco shell
- Calories: 350
- Sugar: 2g
- Sodium: 600mg
- Fat: 20g
- Saturated Fat: 10g
- Unsaturated Fat: 5g
- Trans Fat: 0g
- Carbohydrates: 30g
- Fiber: 3g
- Protein: 15g
- Cholesterol: 50mg