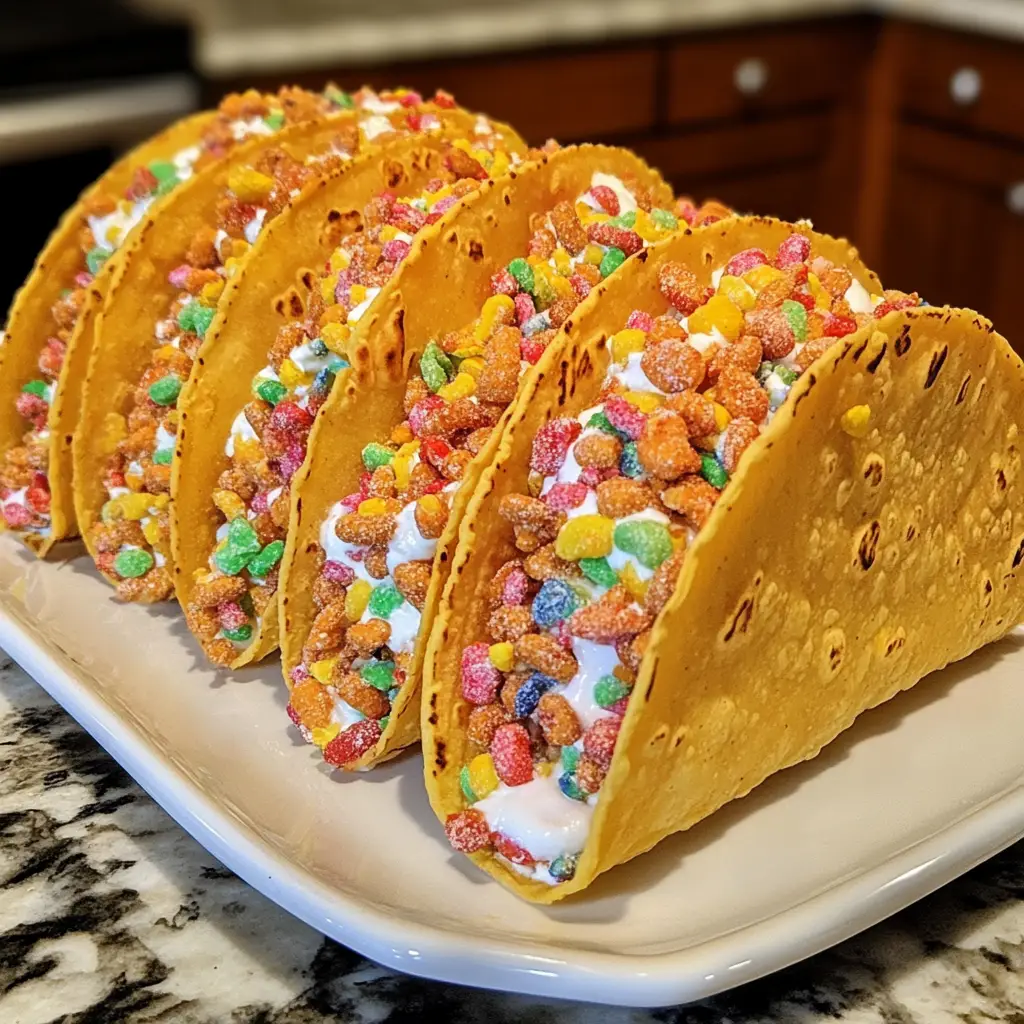
Introduction to Fruity Pebbles Cheesecake Tacos
Hey there, fellow dessert lovers! If you’re looking for a fun and easy treat that will bring smiles to your family’s faces, look no further than these Fruity Pebbles Cheesecake Tacos. They’re a delightful twist on traditional cheesecake, wrapped in a crispy taco shell and bursting with colorful crunch. Perfect for busy days or special occasions, this recipe is a quick solution that requires no baking. Trust me, these sweet surprises will impress your loved ones and make any gathering feel like a celebration. Let’s dive into this delicious adventure together!
Why You’ll Love This Fruity Pebbles Cheesecake Tacos
These Fruity Pebbles Cheesecake Tacos are not just a treat; they’re a lifesaver for busy moms like us! They come together in just 15 minutes, making them a breeze to whip up. The combination of creamy cheesecake and crunchy cereal creates a delightful explosion of flavor in every bite. Plus, they’re a hit with kids and adults alike, ensuring everyone leaves the table with a smile!
Ingredients for Fruity Pebbles Cheesecake Tacos
Gathering the right ingredients is the first step to creating these delightful Fruity Pebbles Cheesecake Tacos. Here’s what you’ll need:
- Taco shells: The crispy base that holds all the deliciousness. You can use store-bought or make your own for a personal touch.
- Cream cheese: This is the heart of the cheesecake filling. Make sure it’s softened for easy mixing.
- Powdered sugar: This adds sweetness and helps achieve that smooth, creamy texture we all love.
- Vanilla extract: A splash of this brings warmth and depth to the flavor profile.
- Whipped cream: This lightens the mixture, making it fluffy and airy. You can use store-bought or homemade.
- Fruity Pebbles cereal: The star of the show! This colorful cereal adds a fun crunch and fruity flavor.
- Optional: Additional Fruity Pebbles for garnish. A sprinkle on top makes for a vibrant presentation.
For exact measurements, check the bottom of the article where you can find everything listed for easy printing. Happy cooking!
How to Make Fruity Pebbles Cheesecake Tacos
Now that we have our ingredients ready, let’s dive into the fun part—making these Fruity Pebbles Cheesecake Tacos! Follow these simple steps, and you’ll have a delightful dessert in no time.
Step 1: Prepare the Cream Cheese Mixture
Start by placing your softened cream cheese in a mixing bowl. Using an electric mixer, beat it until it’s smooth and creamy. This step is crucial because a well-mixed cream cheese ensures a velvety texture in your cheesecake filling. No one wants lumps in their dessert, right?
Step 2: Add Sweetness and Flavor
Next, sprinkle in the powdered sugar and pour in the vanilla extract. Mix these ingredients together until they’re fully combined. The powdered sugar adds just the right amount of sweetness, while the vanilla extract enhances the overall flavor, making it taste like a slice of heaven!
Step 3: Fold in the Whipped Cream
Now, it’s time to fold in the whipped cream. Gently add it to the cream cheese mixture. Use a spatula to carefully combine them, making sure to maintain that light and fluffy texture. This step is key; if you stir too hard, you’ll lose all that airy goodness!
Step 4: Mix in the Fruity Pebbles
Once your mixture is fluffy, it’s time to add the star of the show—Fruity Pebbles! Gently stir them in until they’re evenly distributed. This ensures every bite is packed with that fun crunch and fruity flavor. Trust me, you’ll want to savor every colorful morsel!
Step 5: Fill the Taco Shells
Now comes the fun part—filling the taco shells! Take a spoonful of the cheesecake mixture and carefully fill each taco shell. To avoid a mess, I like to use a piping bag, but a simple spoon works just fine too. Just be gentle, and don’t overfill them!
Step 6: Chill Before Serving
Finally, place your filled tacos in the refrigerator for at least 30 minutes. Chilling allows the flavors to meld together and helps the filling set up nicely. Plus, it makes for a refreshing treat on a warm day. Trust me, the wait will be worth it!
Tips for Success
- Make sure your cream cheese is at room temperature for easy mixing.
- For extra crunch, add more Fruity Pebbles just before serving.
- Use a piping bag for mess-free filling of the taco shells.
- Chill the tacos longer if you prefer a firmer texture.
- Feel free to experiment with different cereals for a unique twist!
Equipment Needed
- Mixing bowl: A large bowl for combining ingredients. A glass or metal bowl works great.
- Electric mixer: For beating the cream cheese. A whisk can be used if you’re feeling adventurous!
- Spatula: Essential for folding in the whipped cream.
- Piping bag or spoon: For filling the taco shells without a mess.
- Refrigerator: To chill your delicious creations before serving.
Variations
- Chocolate Lovers: Swap out some of the cream cheese for chocolate cream cheese for a rich twist.
- Fruit Additions: Add fresh fruit like strawberries or bananas to the filling for a fruity burst.
- Gluten-Free Option: Use gluten-free taco shells to make this dessert suitable for gluten-sensitive friends.
- Vegan Version: Substitute cream cheese with a vegan alternative and use coconut whipped cream for a dairy-free treat.
- Nutty Crunch: Mix in crushed nuts like almonds or pecans for an added layer of texture and flavor.
Serving Suggestions
- Pair these Fruity Pebbles Cheesecake Tacos with a scoop of vanilla ice cream for an extra indulgent treat.
- Serve with fresh fruit like strawberries or blueberries for a refreshing contrast.
- For a fun presentation, arrange the tacos on a colorful platter and sprinkle extra Fruity Pebbles around them.
- Enjoy with a glass of cold milk or a fruity smoothie to complement the flavors.
FAQs about Fruity Pebbles Cheesecake Tacos
Can I make Fruity Pebbles Cheesecake Tacos ahead of time?
Absolutely! These delightful tacos can be made a few hours in advance. Just fill the taco shells and chill them in the refrigerator until you’re ready to serve. This makes them a perfect dessert for parties or gatherings!
What can I use instead of cream cheese?
If you’re looking for a lighter option, you can substitute cream cheese with Greek yogurt. It will still give you that creamy texture while adding a bit of tanginess. For a vegan alternative, try using a plant-based cream cheese.
How do I store leftovers?
Store any leftover Fruity Pebbles Cheesecake Tacos in an airtight container in the refrigerator. They’re best enjoyed within a couple of days, but I doubt they’ll last that long!
Can I use other cereals for this recipe?
Definitely! While Fruity Pebbles are the star here, feel free to experiment with other cereals. Try using Cocoa Pebbles for a chocolatey twist or even a crunchy granola for a different texture.
How many servings does this recipe yield?
This recipe makes about 12 tacos, perfect for sharing with family and friends. But if you’re like me, you might want to keep a few for yourself!
Final Thoughts
Creating these Fruity Pebbles Cheesecake Tacos is more than just making a dessert; it’s about bringing joy to your kitchen and smiles to your loved ones. The vibrant colors and playful crunch of Fruity Pebbles make every bite a delightful experience. Whether it’s a family gathering or a simple weeknight treat, these tacos are sure to spark happiness. Plus, the ease of preparation means you can spend less time in the kitchen and more time enjoying the moments that matter. So, roll up your sleeves and dive into this sweet adventure—you won’t regret it!
Print
Fruity Pebbles Cheesecake Tacos: A Sweet Surprise Awaits!
- Total Time: 45 minutes (including chilling time)
- Yield: 12 tacos 1x
- Diet: Vegetarian
Description
Fruity Pebbles Cheesecake Tacos are a delightful dessert that combines the flavors of cheesecake with the fun and colorful crunch of Fruity Pebbles cereal, all wrapped in a taco shell.
Ingredients
- 1 package of taco shells
- 8 oz cream cheese, softened
- 1/2 cup powdered sugar
- 1 tsp vanilla extract
- 1 cup whipped cream
- 1 cup Fruity Pebbles cereal
- Optional: additional Fruity Pebbles for garnish
Instructions
- In a mixing bowl, beat the softened cream cheese until smooth.
- Add the powdered sugar and vanilla extract, and mix until well combined.
- Fold in the whipped cream gently until the mixture is light and fluffy.
- Stir in the Fruity Pebbles cereal until evenly distributed.
- Carefully fill each taco shell with the cheesecake mixture.
- Top with additional Fruity Pebbles if desired.
- Chill in the refrigerator for at least 30 minutes before serving.
Notes
- For a crunchier texture, add more Fruity Pebbles just before serving.
- These tacos can be made a few hours in advance for convenience.
- Store any leftovers in an airtight container in the refrigerator.
- Prep Time: 15 minutes
- Cook Time: 0 minutes
- Category: Dessert
- Method: No-bake
- Cuisine: American
Nutrition
- Serving Size: 1 taco
- Calories: 150
- Sugar: 10g
- Sodium: 100mg
- Fat: 7g
- Saturated Fat: 4g
- Unsaturated Fat: 2g
- Trans Fat: 0g
- Carbohydrates: 20g
- Fiber: 0g
- Protein: 2g
- Cholesterol: 30mg