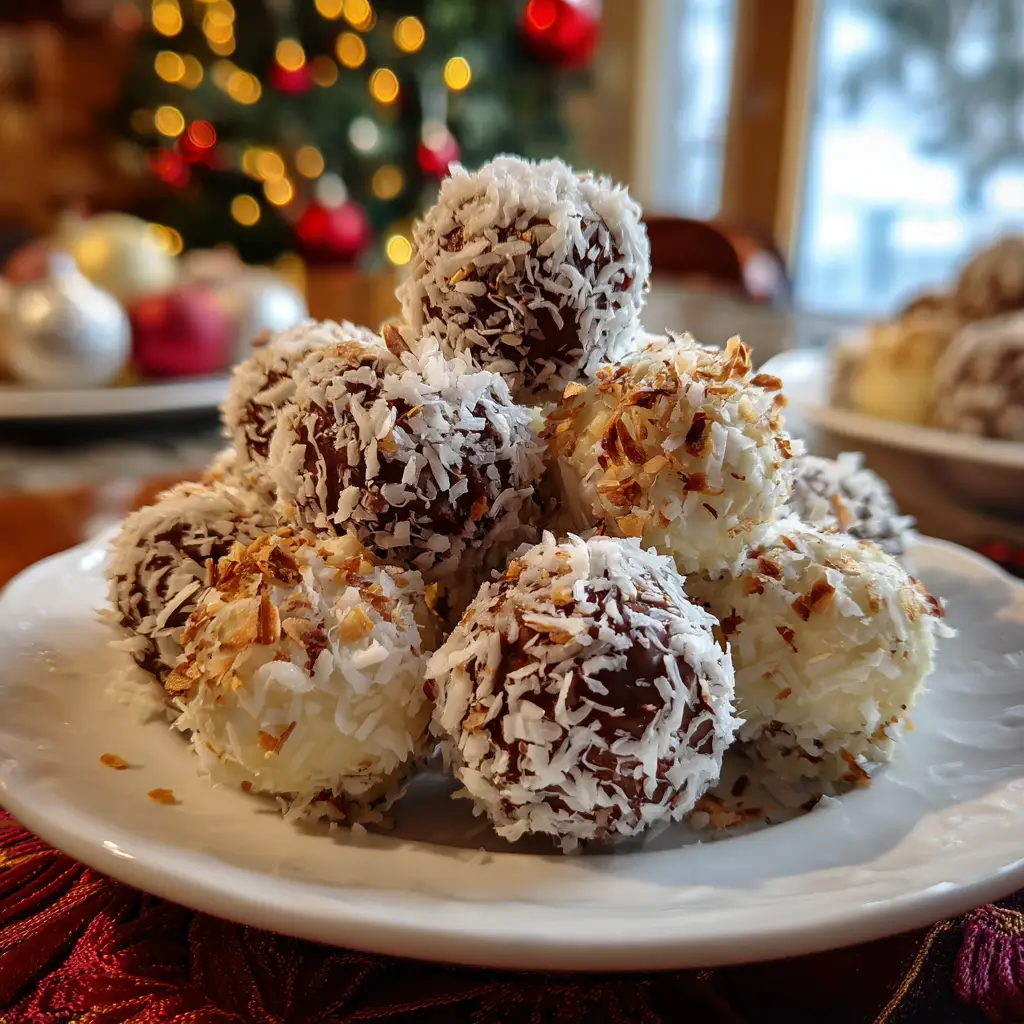
Introduction to Christmas Truffles
As the holiday season approaches, I find myself dreaming of sweet treats that bring joy to my family and friends. Christmas Truffles are one of those delightful creations that never fail to impress. They’re rich, chocolatey, and oh-so-festive!
Whether you’re a busy mom juggling holiday plans or a professional looking to add a special touch to your gatherings, these truffles are the perfect solution. They’re quick to whip up and can be made ahead of time, allowing you to savor the season without the stress. Trust me, your loved ones will be asking for seconds!
Why You’ll Love This Christmas Truffles
Christmas Truffles are not just a treat; they’re a lifesaver during the busy holiday season. With just a handful of ingredients and minimal effort, you can create a dessert that looks and tastes gourmet. They’re perfect for last-minute gatherings or cozy nights in. Plus, the rich chocolate combined with festive flavors will have everyone raving. Who doesn’t love a sweet indulgence that’s both easy and impressive?
Ingredients for Christmas Truffles
Creating these delightful Christmas Truffles is a breeze with just a few simple ingredients. Here’s what you’ll need:
- Dark chocolate: The star of the show! Choose high-quality chocolate for a rich flavor.
- Heavy cream: This adds creaminess and helps the chocolate melt beautifully.
- Vanilla extract: A splash of this enhances the chocolate’s flavor, making it even more decadent.
- Powdered sugar: This sweetens the mixture and gives the truffles a smooth texture.
- Cocoa powder: Perfect for dusting! It adds a lovely finish and a hint of bitterness to balance the sweetness.
- Crushed peppermint candies (optional): For a festive twist, these add a delightful crunch and holiday flavor.
Feel free to get creative! You can substitute dark chocolate with milk chocolate for a sweeter taste or use dairy-free cream for a vegan option. The exact quantities of these ingredients are listed at the bottom of the article, ready for you to print and take to the kitchen!
How to Make Christmas Truffles
Making Christmas Truffles is a delightful journey that fills your kitchen with the warm aroma of chocolate. Follow these simple steps, and you’ll have a batch of festive treats ready to impress your family and friends!
Step 1: Heat the Cream
Start by pouring the heavy cream into a saucepan. Heat it over medium heat until it begins to simmer. Keep an eye on it; you don’t want it to boil over! This step is crucial as it helps the chocolate melt smoothly.
Step 2: Melt the Chocolate
Once the cream is simmering, remove it from the heat. Add the chopped dark chocolate to the pan. Stir gently until the chocolate is completely melted and the mixture is smooth. The rich aroma will make your mouth water!
Step 3: Combine Ingredients
Next, stir in the vanilla extract and powdered sugar. Mix until everything is well combined. This is where the magic happens! The chocolate mixture should be glossy and inviting, perfect for your Christmas Truffles.
Step 4: Chill the Mixture
Transfer the mixture to a bowl and cover it with plastic wrap. Refrigerate for about 2 hours, or until it’s firm enough to handle. Patience is key here! This chilling time allows the flavors to meld beautifully.
Step 5: Shape the Truffles
Once the mixture is firm, it’s time to get your hands a little messy! Use a melon baller or your hands to scoop out small portions. Roll them into balls, about the size of a walnut. Don’t worry if they’re not perfect; the charm is in their homemade look!
Step 6: Coat the Truffles
Now comes the fun part! Roll the truffles in cocoa powder or crushed peppermint candies to coat them. This adds a festive touch and a burst of flavor. You can even mix and match coatings for a colorful presentation!
Step 7: Refrigerate Until Ready
Place the coated truffles on a baking sheet lined with parchment paper. Pop them back in the fridge until you’re ready to serve. This will keep them firm and delicious. Trust me, the wait will be worth it when you see the smiles on everyone’s faces!
Tips for Success
- Use high-quality chocolate for the best flavor; it makes a world of difference!
- Don’t rush the chilling process; letting the mixture firm up properly is key.
- Experiment with different coatings like chopped nuts or coconut for variety.
- Keep your hands slightly damp when rolling to prevent sticking.
- Store truffles in an airtight container to maintain freshness.
Equipment Needed
- Medium saucepan: A small pot works too if you don’t have one.
- Mixing bowl: Any bowl will do, just ensure it’s large enough for mixing.
- Melon baller or spoon: A regular spoon can also shape the truffles.
- Parchment paper: Wax paper is a good alternative for lining the baking sheet.
Variations of Christmas Truffles
- Mint Chocolate Truffles: Add a splash of peppermint extract to the chocolate mixture for an extra minty kick.
- Nutty Delight: Roll the truffles in finely chopped nuts like almonds or hazelnuts for a crunchy texture.
- Spiced Orange Truffles: Incorporate a teaspoon of orange zest and a pinch of cinnamon for a warm, festive flavor.
- Vegan Truffles: Substitute dark chocolate with dairy-free chocolate and use coconut cream instead of heavy cream.
- Caramel Swirl Truffles: Add a dollop of caramel sauce in the center before rolling for a gooey surprise.
Serving Suggestions for Christmas Truffles
- Pair your truffles with a warm cup of hot cocoa or spiced chai for a cozy treat.
- Serve them on a festive platter, garnished with fresh mint leaves or edible gold dust for a touch of elegance.
- Include a selection of truffles in gift boxes for a delightful homemade gift.
- For a fun twist, create a truffle bar with various coatings and toppings for guests to customize their own.
FAQs about Christmas Truffles
Can I make Christmas Truffles ahead of time?
Absolutely! These truffles can be made a few days in advance. Just store them in an airtight container in the refrigerator. They’ll stay fresh and delicious, ready to impress your guests!
What type of chocolate is best for truffles?
I recommend using high-quality dark chocolate for the richest flavor. However, you can also use milk chocolate if you prefer a sweeter taste. Just remember, the better the chocolate, the better your truffles will be!
How long do Christmas Truffles last?
When stored properly in the fridge, these truffles can last up to a week. Just make sure they’re in an airtight container to keep them fresh and tasty.
Can I customize the flavors of my truffles?
Definitely! Feel free to experiment with different extracts, like almond or orange, or add spices like cinnamon. The possibilities are endless, and it’s a fun way to make them your own!
Are Christmas Truffles suitable for a gluten-free diet?
Yes! The ingredients in this recipe are naturally gluten-free. Just double-check any coatings or additional ingredients you might use to ensure they’re gluten-free as well.
Final Thoughts
As I reflect on the joy of making Christmas Truffles, I can’t help but smile. These little bites of chocolatey bliss bring warmth and happiness to any gathering. They’re not just a treat; they’re a way to create memories with loved ones.
Whether you’re sharing them at a holiday party or enjoying them during a cozy night in, these truffles are sure to delight. So, roll up your sleeves, embrace the holiday spirit, and indulge in the sweet satisfaction of creating something special. Trust me, the smiles you’ll receive will be the best gift of all!
Print
Christmas Truffles: Delight Your Taste Buds This Season!
- Total Time: 2 hours 25 minutes
- Yield: 24 truffles 1x
- Diet: Vegetarian
Description
Christmas Truffles are a delightful treat that combines rich chocolate with festive flavors, perfect for the holiday season.
Ingredients
- 8 oz dark chocolate, chopped
- 1/2 cup heavy cream
- 1 tsp vanilla extract
- 1/4 cup powdered sugar
- 1/2 cup cocoa powder (for dusting)
- 1/4 cup crushed peppermint candies (optional)
Instructions
- In a saucepan, heat the heavy cream over medium heat until it begins to simmer.
- Remove from heat and add the chopped dark chocolate, stirring until melted and smooth.
- Stir in the vanilla extract and powdered sugar until well combined.
- Refrigerate the mixture for about 2 hours, or until firm.
- Once firm, use a melon baller or your hands to scoop out small portions and roll them into balls.
- Roll the truffles in cocoa powder or crushed peppermint candies to coat.
- Place the truffles on a baking sheet lined with parchment paper and refrigerate until ready to serve.
Notes
- For a different flavor, try adding a splash of peppermint extract to the chocolate mixture.
- These truffles can be stored in an airtight container in the refrigerator for up to a week.
- Feel free to experiment with different coatings like chopped nuts or shredded coconut.
- Prep Time: 20 minutes
- Cook Time: 5 minutes
- Category: Dessert
- Method: No-Bake
- Cuisine: American
Nutrition
- Serving Size: 1 truffle
- Calories: 100
- Sugar: 8g
- Sodium: 5mg
- Fat: 7g
- Saturated Fat: 4g
- Unsaturated Fat: 2g
- Trans Fat: 0g
- Carbohydrates: 10g
- Fiber: 1g
- Protein: 1g
- Cholesterol: 5mg