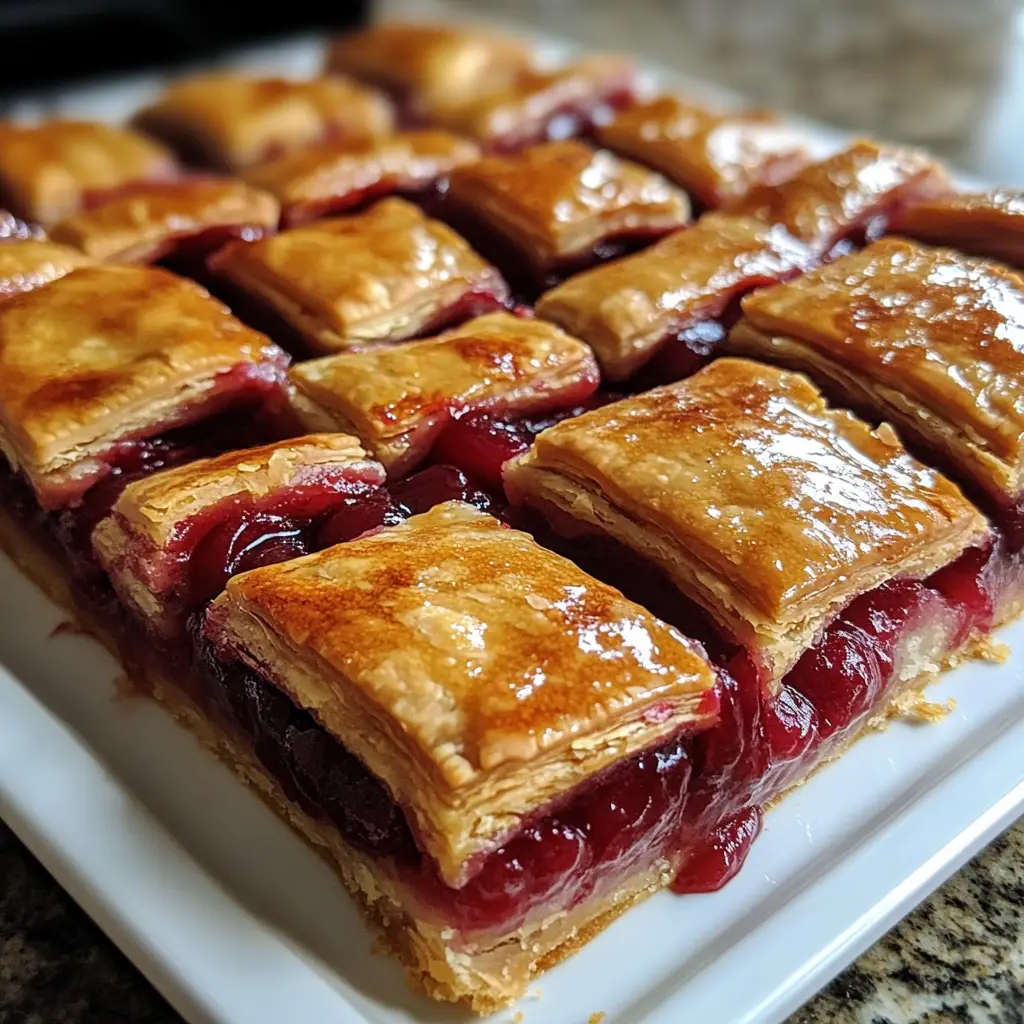
Introduction to Cherry Pie Bombs
Hey there, fellow food lovers! If you’re anything like me, you know that life can get pretty hectic. Between juggling work, family, and everything in between, finding time to whip up something special can feel impossible. That’s where these delightful Cherry Pie Bombs come in! They’re not just a quick solution for a busy day; they’re a sweet treat that’ll impress your loved ones. Imagine biting into a warm, flaky pastry bursting with sweet cherry filling. It’s like a hug for your taste buds! Let’s dive into this delicious adventure together.
Why You’ll Love This Cherry Pie Bombs
Cherry Pie Bombs are the perfect blend of ease and indulgence. They come together in just 25 minutes, making them a fantastic option for busy moms and professionals alike. The crispy exterior gives way to a warm, gooey cherry filling that’s simply irresistible. Plus, they’re versatile! You can customize them with different fillings, ensuring everyone at the table leaves with a smile. Trust me, these little treats are bound to become a family favorite!
Ingredients for Cherry Pie Bombs
Let’s gather our ingredients for these delightful Cherry Pie Bombs! Each one plays a crucial role in creating that perfect bite of sweetness. Here’s what you’ll need:
- Cherry Pie Filling: The star of the show! This sweet, tangy filling is what makes each bomb a burst of flavor. You can use store-bought for convenience or make your own if you’re feeling adventurous.
- Refrigerated Biscuit Dough: This is your shortcut to flaky pastry. It’s easy to work with and saves time. If you prefer, you can use homemade dough, but I promise the store-bought version is just as delicious!
- Powdered Sugar: This will be used to create a sweet glaze that adds a lovely finish to your bombs. It’s light and melts beautifully, making your treats look as good as they taste.
- Vanilla Extract: A splash of this adds depth to your glaze. It enhances the sweetness and brings out the flavors of the cherry filling.
- Oil for Frying: You’ll need this to achieve that golden, crispy exterior. Vegetable oil works well, but feel free to use canola or peanut oil if you prefer.
For those who want to get creative, consider experimenting with different fruit fillings like apple or blueberry. The possibilities are endless! You can find the exact quantities for each ingredient at the bottom of the article, ready for printing. Let’s get cooking!
How to Make Cherry Pie Bombs
Now that we have our ingredients ready, let’s dive into the fun part—making these Cherry Pie Bombs! Follow these simple steps, and you’ll have a batch of warm, gooey treats in no time.
Step 1: Heat the Oil
First things first, we need to heat the oil. Grab a deep fryer or a large pot and fill it with oil. Heat it to 350°F (175°C). This temperature is key for achieving that crispy exterior. If you don’t have a thermometer, just drop a small piece of dough in. If it sizzles, you’re good to go!
Step 2: Prepare the Biscuit Dough
Next, open your package of refrigerated biscuit dough. Carefully separate the biscuits and lay them out on a clean surface. You’ll want to flatten each biscuit to create a nice little pocket for the cherry filling. A rolling pin works wonders here, but your hands will do just fine too!
Step 3: Fill the Biscuits
Now comes the fun part—filling the biscuits! Take a spoonful of cherry pie filling and place it right in the center of each flattened biscuit. Don’t overfill them, or you’ll have a messy explosion in the oil. A tablespoon is usually just the right amount!
Step 4: Seal the Bombs
Once filled, it’s time to seal the bombs. Fold the biscuit over the filling and pinch the edges tightly to ensure they’re closed. This step is crucial to keep the delicious cherry filling from leaking out while frying. Think of it as giving your bombs a cozy little hug!
Step 5: Fry the Cherry Pie Bombs
Carefully place the filled biscuits into the hot oil, a few at a time. Fry them for about 2-3 minutes on each side, or until they turn a beautiful golden brown. Use a slotted spoon to turn them gently. This is where the magic happens, and your kitchen will start to smell heavenly!
Step 6: Make the Glaze
While the bombs are frying, let’s whip up that sweet glaze. In a bowl, mix powdered sugar with a splash of vanilla extract and a little water. Stir until you achieve a smooth, pourable consistency. This glaze will add a lovely finish to your Cherry Pie Bombs!
Step 7: Drizzle and Serve
Once the bombs are golden and crispy, remove them from the oil and let them drain on paper towels. This helps get rid of any excess oil. Now, while they’re still warm, drizzle the glaze over the top. Serve them up and watch your family’s faces light up with joy!
Tips for Success
- Don’t overfill the biscuits to prevent bursting during frying.
- Keep the oil temperature steady for even cooking.
- Use a slotted spoon to gently turn the bombs while frying.
- Let the bombs cool slightly before glazing for better adhesion.
- Experiment with different fruit fillings for a fun twist!
Equipment Needed
- Deep Fryer or Large Pot: A deep fryer is ideal, but a heavy pot works just as well.
- Slotted Spoon: This helps you safely turn and remove the bombs from the hot oil.
- Mixing Bowl: Use this for preparing the glaze.
- Rolling Pin (optional): Great for flattening the biscuit dough, but your hands will do just fine!
Variations
- Fruit Fillings: Swap out cherry filling for other fruits like apple, blueberry, or even peach for a delightful twist.
- Gluten-Free Option: Use gluten-free biscuit dough to make these Cherry Pie Bombs suitable for those with dietary restrictions.
- Chocolate Lovers: Add a spoonful of chocolate hazelnut spread or chocolate chips along with the cherry filling for a decadent treat.
- Spiced Up: Mix in a pinch of cinnamon or nutmeg with the cherry filling for an extra layer of flavor.
- Healthier Glaze: Substitute powdered sugar with a sugar-free alternative or use honey for a more natural sweetener in the glaze.
Serving Suggestions
- Pair with Ice Cream: Serve warm Cherry Pie Bombs with a scoop of vanilla ice cream for a delightful contrast.
- Fresh Whipped Cream: A dollop of whipped cream on top adds a creamy touch.
- Presentation: Dust with extra powdered sugar for a beautiful finish.
- Drink Pairing: Enjoy with a cup of coffee or a refreshing glass of lemonade.
FAQs about Cherry Pie Bombs
As you embark on your Cherry Pie Bomb adventure, you might have a few questions. Don’t worry; I’ve got you covered! Here are some common queries that pop up when making these delightful treats.
Can I use frozen cherries instead of cherry pie filling?
Absolutely! If you have frozen cherries, just thaw and cook them down with a bit of sugar and cornstarch to create your own filling. It’s a great way to use fresh ingredients!
How do I store leftover Cherry Pie Bombs?
Store any leftovers in an airtight container at room temperature for up to two days. If you want to keep them longer, consider refrigerating them. Just reheat in the oven for a few minutes to regain that crispy texture!
Can I bake these instead of frying?
Yes, you can! Preheat your oven to 375°F (190°C) and place the filled biscuits on a baking sheet lined with parchment paper. Bake for about 15-20 minutes or until golden brown. They won’t be as crispy, but they’ll still be delicious!
What other fillings can I try?
The sky’s the limit! You can use apple pie filling, blueberry filling, or even a mix of cream cheese and fruit for a different flavor profile. Get creative and find your favorite!
Are Cherry Pie Bombs suitable for kids?
Definitely! These treats are a hit with kids. Just be sure to supervise them while frying, as the oil can be hot. They’ll love helping to fill and seal the bombs!
Final Thoughts
Making Cherry Pie Bombs is more than just a cooking project; it’s a delightful experience that brings joy to your kitchen. The aroma of frying pastries fills the air, creating a warm, inviting atmosphere. Watching your loved ones’ faces light up as they take that first bite is priceless. These little treats are perfect for any occasion, whether it’s a family gathering or a cozy night in. Plus, the versatility of flavors means you can keep things exciting. So roll up your sleeves, gather your ingredients, and let the sweet adventure begin. You won’t regret it!
Print
Cherry Pie Bombs: Discover This Sweet, Explosive Treat!
- Total Time: 25 minutes
- Yield: 12 servings 1x
- Diet: Vegetarian
Description
Cherry Pie Bombs are delightful pastry treats filled with sweet cherry filling, perfect for satisfying your sweet tooth.
Ingredients
- 1 can cherry pie filling
- 1 package refrigerated biscuit dough
- 1 cup powdered sugar
- 1 teaspoon vanilla extract
- Oil for frying
Instructions
- Heat oil in a deep fryer or large pot to 350°F (175°C).
- Open the biscuit dough and separate it into individual biscuits.
- Flatten each biscuit and place a spoonful of cherry pie filling in the center.
- Fold the biscuit over the filling and pinch the edges to seal.
- Carefully place the filled biscuits into the hot oil and fry until golden brown, about 2-3 minutes per side.
- Remove from oil and drain on paper towels.
- In a bowl, mix powdered sugar and vanilla extract with a little water to create a glaze.
- Drizzle the glaze over the warm Cherry Pie Bombs before serving.
Notes
- Ensure the filling is not too full to prevent bursting during frying.
- These can be served warm or at room temperature.
- Experiment with different fruit fillings for variety.
- Prep Time: 15 minutes
- Cook Time: 10 minutes
- Category: Dessert
- Method: Frying
- Cuisine: American
Nutrition
- Serving Size: 1 bomb
- Calories: 150
- Sugar: 10g
- Sodium: 200mg
- Fat: 7g
- Saturated Fat: 1g
- Unsaturated Fat: 5g
- Trans Fat: 0g
- Carbohydrates: 20g
- Fiber: 1g
- Protein: 2g
- Cholesterol: 0mg