Introduction to Elegant Pistachio Raspberry Crunch Cheesecake
Welcome to the world of delightful desserts! If you’re looking for a show-stopping treat that’s both easy to make and utterly delicious, the Elegant Pistachio Raspberry Crunch Cheesecake is just what you need. This cheesecake is perfect for busy moms and professionals like us, who want to impress loved ones without spending hours in the kitchen. With its crunchy pistachio crust and creamy raspberry filling, it’s a dessert that brings joy to any gathering. Trust me, this cheesecake will not only satisfy your sweet tooth but also create sweet memories around the table.
Why You’ll Love This Elegant Pistachio Raspberry Crunch Cheesecake
This Elegant Pistachio Raspberry Crunch Cheesecake is a dream come true for busy cooks. It combines simplicity with stunning flavors, making it a go-to dessert for any occasion. The crunchy pistachio crust adds a delightful texture, while the creamy raspberry filling bursts with freshness. Plus, it’s quick to prepare, allowing you to spend more time with your loved ones and less time in the kitchen. What’s not to love?
Ingredients for Elegant Pistachio Raspberry Crunch Cheesecake
Gathering the right ingredients is the first step to creating this delightful cheesecake. Here’s what you’ll need:
- Pistachios: These nutty gems form the crunchy crust. They add a unique flavor and a beautiful green hue.
- Granulated Sugar: This sweetener balances the flavors and helps create a lovely texture in the crust.
- Unsalted Butter: Melted butter binds the crust together, giving it a rich taste. Unsalted is best to control the saltiness.
- Cream Cheese: The star of the cheesecake filling! It provides that creamy, luscious texture we all crave.
- Powdered Sugar: This fine sugar dissolves easily, ensuring a smooth filling without any graininess.
- Vanilla Extract: A splash of vanilla enhances the overall flavor, making it even more delightful.
- Fresh Raspberries: These juicy berries add a burst of flavor and a pop of color to the cheesecake.
- Heavy Cream: Whipped into fluffy peaks, it lightens the cheesecake filling, making it airy and indulgent.
- Raspberry Puree: This optional ingredient can intensify the raspberry flavor. You can make it by blending fresh raspberries.
For exact measurements, check the bottom of the article where you can find everything listed for easy printing. Happy cooking!
How to Make Elegant Pistachio Raspberry Crunch Cheesecake
Now that you have all your ingredients ready, let’s dive into the steps to create this stunning dessert. Each step is simple, and I promise you’ll feel like a pro in no time!
Step 1: Preheat the Oven
First things first, preheat your oven to 350°F (175°C). Preheating is crucial because it ensures that your crust bakes evenly. A hot oven helps the crust set perfectly, giving it that delightful crunch we all love. So, don’t skip this step!
Step 2: Prepare the Pistachio Crust
Next, grab your food processor and blend the shelled pistachios with granulated sugar until they’re finely ground. This mixture will be the base of your cheesecake. Once blended, add the melted butter and mix until everything is well combined. The butter acts like glue, holding the crust together and adding richness.
Step 3: Bake the Crust
Now, press the pistachio mixture firmly into the bottom of a springform pan. Make sure it’s even and compact. Bake the crust for about 10 minutes, then let it cool completely. This cooling time is essential, as it allows the crust to firm up before adding the creamy filling.
Step 4: Make the Cheesecake Filling
In a large bowl, beat the softened cream cheese, powdered sugar, and vanilla extract until smooth and creamy. This is where the magic happens! Gently fold in the fresh raspberries, being careful not to break them apart too much. Their vibrant color and flavor will shine through in your cheesecake.
Step 5: Combine with Whipped Cream
In a separate bowl, whip the heavy cream until stiff peaks form. This step is key for a light and airy texture. Once whipped, fold the cream into the cheesecake mixture gently. This will give your cheesecake that luxurious, fluffy feel that melts in your mouth.
Step 6: Add Raspberry Puree
Now, it’s time to add a touch of elegance! Drizzle the raspberry puree over the cheesecake filling and use a knife or skewer to swirl it gently. This not only enhances the flavor but also creates a beautiful marbled effect that’s sure to impress.
Step 7: Chill the Cheesecake
Finally, refrigerate your cheesecake for at least 4 hours, or overnight if you can wait. Chilling is vital for the flavors to meld and the texture to set. Trust me, the wait will be worth it when you take that first bite!
Tips for Success
- Always use room temperature cream cheese for a smoother filling.
- Don’t rush the chilling process; it’s key for the best texture.
- For a nut-free version, substitute the pistachios with crushed graham crackers.
- Feel free to adjust the raspberry puree to your taste for a bolder flavor.
- Garnish with extra fresh raspberries for a stunning presentation!
Equipment Needed
- Food Processor: Essential for blending the pistachios. A blender can work in a pinch.
- Springform Pan: Perfect for easy removal of the cheesecake. A regular cake pan can be used, but it may be trickier to serve.
- Mixing Bowls: Use a large bowl for the filling and a separate one for whipping cream.
- Whisk or Electric Mixer: For beating the cream cheese and whipping the cream.
Variations
- Chocolate Drizzle: Add a rich chocolate drizzle on top for a decadent twist.
- Nut-Free Option: Replace pistachios with crushed graham crackers or oats for a gluten-free crust.
- Vegan Version: Use vegan cream cheese and coconut cream to create a dairy-free cheesecake.
- Fruit Swirls: Experiment with other fruits like strawberries or blueberries for a different flavor profile.
- Spiced Variation: Add a pinch of cinnamon or nutmeg to the filling for a warm, cozy flavor.
Serving Suggestions
- Pair with a dollop of whipped cream for extra indulgence.
- Serve alongside a fresh fruit salad for a refreshing contrast.
- Complement with a cup of herbal tea or a glass of sparkling water.
- Garnish with mint leaves for a pop of color and freshness.
- Present on a beautiful cake stand to elevate your dessert display.
FAQs about Elegant Pistachio Raspberry Crunch Cheesecake
Can I make this cheesecake ahead of time?
Absolutely! This Elegant Pistachio Raspberry Crunch Cheesecake is perfect for making ahead. Just prepare it the day before and let it chill overnight. The flavors will deepen, making it even more delicious!
How do I store leftovers?
Store any leftover cheesecake in an airtight container in the refrigerator. It should stay fresh for up to 3 days. Just be sure to keep it covered to maintain its creamy texture.
Can I use frozen raspberries instead of fresh?
Yes, you can! Just thaw and drain the frozen raspberries before adding them to the filling. They may be a bit softer, but they’ll still add that lovely raspberry flavor.
What can I substitute for pistachios?
If you have nut allergies or simply prefer a different flavor, crushed graham crackers or digestive biscuits work wonderfully as a crust alternative. They’ll give you that sweet crunch without the nuts!
Is this cheesecake suitable for special diets?
This Elegant Pistachio Raspberry Crunch Cheesecake can be adapted for various diets. For a gluten-free version, use gluten-free cookies for the crust. You can also make it vegan by using plant-based cream cheese and coconut cream.
Final Thoughts
Creating the Elegant Pistachio Raspberry Crunch Cheesecake is more than just baking; it’s about crafting moments of joy. Each slice is a celebration of flavors, from the nutty crust to the creamy raspberry filling. I love how this dessert brings family and friends together, sparking laughter and sweet conversations. Whether it’s a special occasion or a simple weeknight treat, this cheesecake never fails to impress. So, roll up your sleeves, embrace the process, and enjoy the delightful experience of sharing this beautiful dessert with your loved ones. Trust me, it’s worth every bite!
Print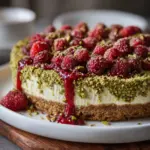
Elegant Pistachio Raspberry Crunch Cheesecake Will Delight You!
- Total Time: 4 hours 40 minutes
- Yield: 8 servings 1x
- Diet: Vegetarian
Description
A delightful cheesecake featuring a crunchy pistachio crust, creamy raspberry filling, and topped with fresh raspberries.
Ingredients
- 1 ½ cups pistachios, shelled
- ½ cup granulated sugar
- ½ cup unsalted butter, melted
- 2 cups cream cheese, softened
- 1 cup powdered sugar
- 1 teaspoon vanilla extract
- 1 cup fresh raspberries
- 1 cup heavy cream
- ¼ cup raspberry puree
Instructions
- Preheat the oven to 350°F (175°C).
- In a food processor, blend the pistachios and granulated sugar until finely ground.
- Add melted butter to the pistachio mixture and mix until combined.
- Press the mixture into the bottom of a springform pan to form the crust.
- Bake the crust for 10 minutes, then let it cool.
- In a large bowl, beat the cream cheese, powdered sugar, and vanilla extract until smooth.
- Fold in the fresh raspberries gently.
- Pour the cheesecake filling over the cooled crust.
- In a separate bowl, whip the heavy cream until stiff peaks form, then fold it into the cheesecake mixture.
- Drizzle raspberry puree on top and swirl it gently.
- Refrigerate for at least 4 hours or overnight before serving.
Notes
- For a more intense raspberry flavor, add more raspberry puree.
- Ensure the cream cheese is at room temperature for a smoother texture.
- Garnish with additional raspberries before serving.
- Prep Time: 30 minutes
- Cook Time: 10 minutes
- Category: Dessert
- Method: Baking and Chilling
- Cuisine: American
Nutrition
- Serving Size: 1 slice
- Calories: 350
- Sugar: 20g
- Sodium: 150mg
- Fat: 25g
- Saturated Fat: 15g
- Unsaturated Fat: 5g
- Trans Fat: 0g
- Carbohydrates: 30g
- Fiber: 2g
- Protein: 5g
- Cholesterol: 80mg